The notification system is King in my Home Assistant setup. I can have visitors that are completely unaware of smart features in my home; up until the house notifies me of finished laundry, garbage collection, an open door or that someone is approaching the house.
Because notifications are so prominent, it’s important to balance out what notifications go where, how often, and at what times of the day.
This article will focus on my notification paradigm and how a tablet dashboard plays a central role. My goal is to achieve a sufficient WAF, and at the same time allow myself some slack to explore stuff for my own satisfaction.
Finding the equilibrium
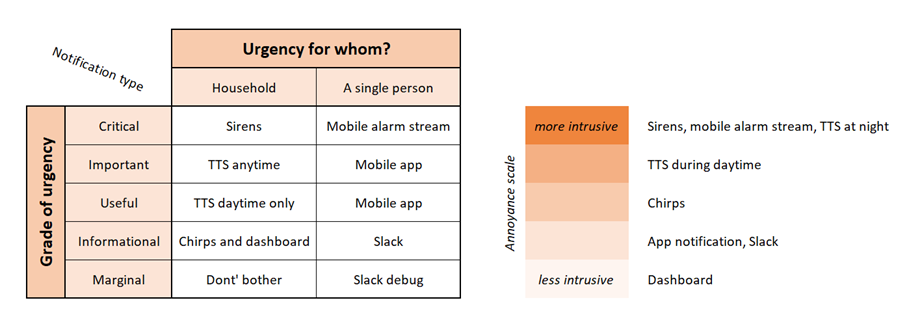
Mentally, I have this chart in my head when I add new notifications to the system:

There must be a balance between the grade of urgency of the message and the recipient’s acceptance for digitally created noise. I’ve found that if the information is important enough to the household, you are safe to use TTS messages throughout the house (at least during daytime). If the message is important only to you, say your 3D-print is done printing, stick to only nudging your own mobile. If the information is of marginal interest to the household, skip sound-based notifications all together or you’ll get complaints from both adults and kids.
Of course, this leaves out a lot of information from your smart home. In comes the dashboard.
The dashboard
Wall mounted tablets with a smart home dashboard is my household’s primary information interface with Home Assistant. The tablets work both as info screens and to configure the smart house.

Personally, I use the standard Home Assistant theme in dark mode. I find it pleasing to the eye and it didn’t require me to invent an entirely new color palette. Also, it doesn’t scream for attention, which ticks a box when it comes to the WAF.
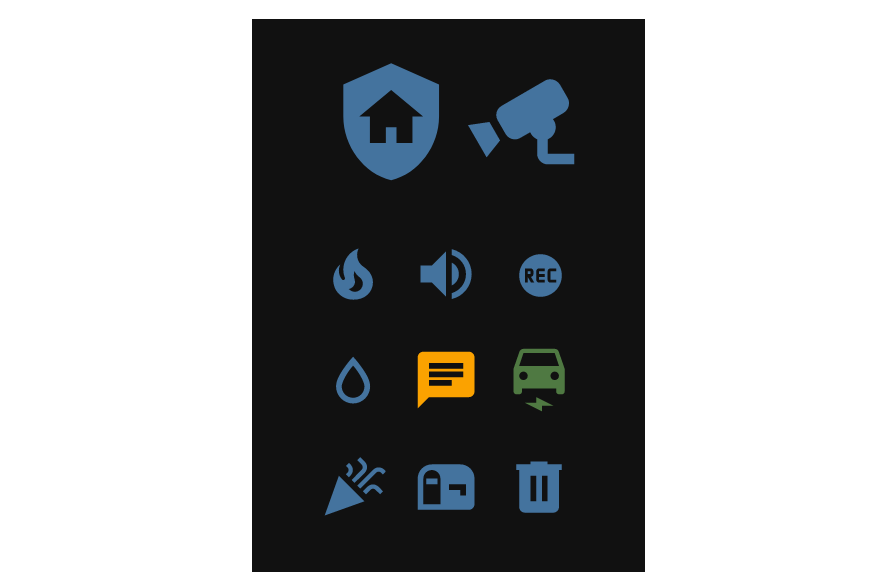
The dashboard conveys a lot of information, but at the same time, it is easy to spot the important information quickly. I’ve tried building a user centered dashboard composed of icons that represent key features or tasks, with the most important information in the leftmost column. Top priority features get bigger icons and are easier to spot.
Granted, my proposed dashboard has a lot of icons, and to make important events/states stand out, I use colors and slowly flashing icons.
White means unknown state. It may for example be that the 3D-printer is turned off and not available.
Blue means a neutral or off state.
Blinking red is used for critical alerts like a burglar alarm, fire alarm, water leak or EV charging error. Some critical alerts also trigger sirens, voice alarms, phone alarms, etc.
Orange is used for important or useful notifications. An orange mailbox means that today is mail delivery day. An orange garbage icon means garbage collection happens tomorrow morning. An orange message icon means there are pending notifications waiting to be acknowledged. Some important or useful notifications trigger TTS on smart speakers and mobile app notifications.
Yellow means on for lights, sirens and heating sources, open for windows and doors or active for motion sensors. Some of these states may trigger a chirp.
Other variants. Some devices or services use additional colors, like the home alarm, where blinking orange means arming, or the EV charger, where blinking green means charging, and steady green means done charging.
The key is drawing attention to states the users might want to catch at a quick glance. This way, the dashboard is a non-intrusive way to give information about your smart home status. Additionally, it invites the user to use the smart home features. One of the most used features in my setup is muting the 15-minute cycle TTS notification saying the laundry is done.
Building the dashboard
I’ve built a responsive dashboard, meaning it adapts to different screen widths. Typically, responsiveness involves prioritizing content differently and using adapted layouts and spacing for desktops, tablets, and mobile phones. You only need to define an icon or component once, then re-use it in your different layouts.
To know more and learn how to set up a basic dashboard; check out my article on building a responsive dashboard. Consider the article a pre-requisite to implement what follows.
When you have your layout and your icons, you can fill them with the intended functionality.
Give color to your states
Consider icon colors the basis of your notification system. A great starting point is using custom button cards from the button-card plugin by RomRider.
With custom button cards, icons are by default colorized with the Home Assistant theme colors corresponding to the entity your icon represents. Blue is neutral/off, yellow is on, white is unknown. The beauty is that you can easily override and tweak this behavior.
You can for example create a button card template that allows you to define standard look for a certain type of button. A simple example is a door icon, where you can combine two templates, one for size and layout, and another for icon and color:
button_tiny:
  show_name: false
  show_state: false
  styles:
    card:
      - width: 27px
      - height: 30px
      - box-shadow: none
      - background: transparent
    icon:
      - width: 23px
      - height: 23px
    grid:
      - grid-template-areas: '"i"'

button_door:
  state:
    - value: "on"
      color: var(--paper-item-icon-active-color)
      icon: mdi:door-open
    - value: "off"
      color: rgb(68, 115, 158)
      icon: mdi:door-closed
Then you assign the template to your button in your dashboard like this:
                         cards:
                            - type: "custom:button-card"
                              template:
                                - button_tiny
                                - button_door
                              entity: binary_sensor.door_mancave
You can specify styles without templates too. Take a temperature sensor inside a fridge. You’d want a fridge icon, and colors depending on the temperature inside. Then you could do something like this, combining a default template and custom styling with temperature values in Celsius:
                       cards:
                          - type: "custom:button-card"
                            template:
                              - button_tiny
                            icon: mdi:fridge
                            entity: sensor.fridge_temperature
                            state:
                              - value: 7
                                operator: ">"
                                styles:
                                  card:
                                    - animation: blink 2s ease infinite
                                  icon:
                                    - color: red
                              - value: 5
                                operator: ">"
                                styles:
                                  card:
                                    - animation: blink 2s ease infinite
                                  icon:
                                    - color: orange
                              - value: 0
                                operator: ">"
                                styles:
                                  icon:
                                    - color: rgb(68, 115, 158)
Normally, when clicking an icon, a default “more information” card will pop up. If you want to customize this behavior, for example in a notification center, use tap_actions like this:
                        card:
                          type: custom:button-card
                          template: button_sidebar_small
                          entity: binary_sensor.active_notifications
                          icon: mdi:message-text
                          state:
                            - value: "on"
                              styles:
                                card:
                                  - animation: blink 2s ease infinite
                                icon:
                                  - color: orange
                          tap_action: !include smarthus-dashboard/notifications.yaml
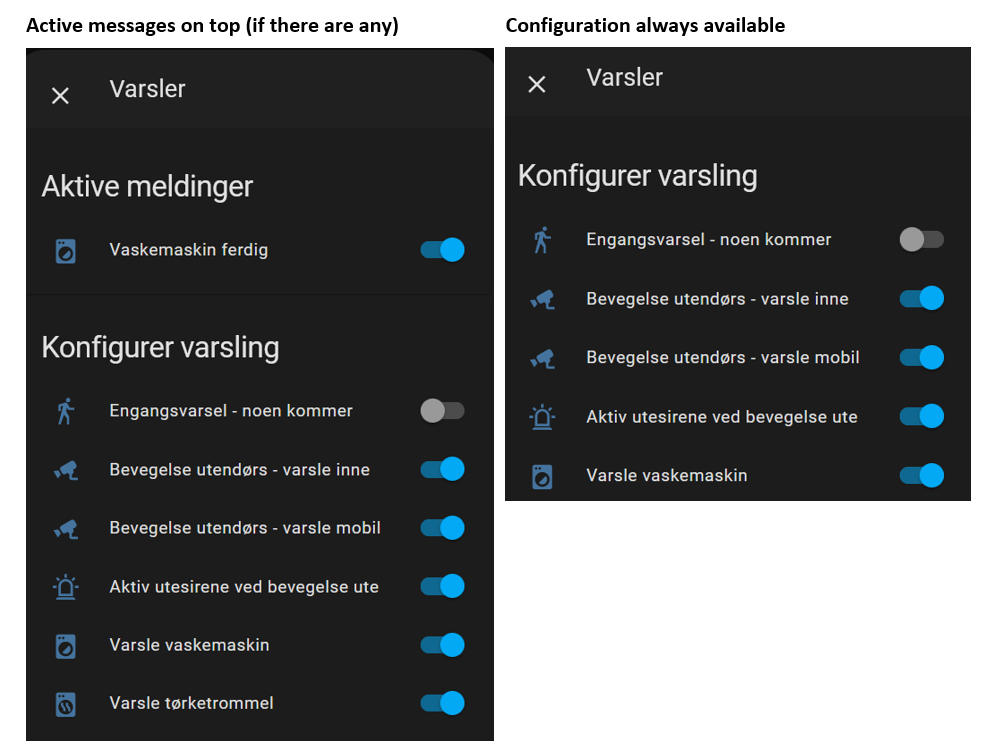
Now, the above button card code incorporates a few interesting elements. It will look like the “message” icon in the below image, and it’s going to blink orange when it’s active.

- The notification card/icon is tied to a template binary sensor, “active_notifications”, that is “on” if there are notifications that should be acknowledged. You can combine alerts and input_booleans, and when one of them is on, you get an active notification icon. If you turn them off, the icon stops blinking. In my setup, this is a template binary sensor that could look like this:
  - name: Active notifications
    unique_id: active_notifications
    state: >
      {{
        is_state('alert.garage_door', 'on')
        or
        is_state('input_boolean.laundry_done', 'on')
        or
        is_state('input_boolean.3d_printer_done', 'on')
}}- When the binary sensor is on, the icon is orange, and blinking slowly. This tells me there is a notification for me.
- The card has a custom tap_action. Tapping the card does nothing with the binary sensor but opens a pop-up containing a notifications center.
Customize popups
Customizing popups is hugely useful, and one thing I use it for is a notification center.
NOTE! Popups have changed in browser-mod 2. See the bottom of this article!
To create a popup, add a tap_action pointing to a YAML-file. For example:
action: fire-dom-event
browser_mod:
  command: popup
  title: Notifications
  card:
    type: custom:layout-card
    layout_type: custom:vertical-layout
    cards:
      - type: conditional
        conditions:
          - entity: binary_sensor.active_notifications
            state: "on"
        card:
          type: entity-filter
          entities:
            - entity: alert.garage_door
            - entity: input_boolean.laundry_done
            - entity: input_boolean.3d_printer_done
          state_filter:
            - "on"
          card:
            type: entities
            title: Active notifications
            show_title: true
            show_header_toggle: false
      - type: entities
        entities:
          - entity: input_boolean.notify_garage_door
            name: Enable garage door notification
          - entity: input_boolean.notify_laundry
            name: Enable laundry notification
          - entity: input_boolean.notify_3d_printer
            name: Enable 3D-printer notification
        title: Configure notifications
        show_header_toggle: false
Pop ups of this kind is a feature of the browser_mod plugin by Thomas Loven. This particular popup will give you a modal containing:
- One area with active notifications that you can acknowledge. This is achieved with an entity filter card that is only visible if there are any notifications to show. This lists selected alerts and input booleans for you to turn off to acknowledge. This is how you mute ongoing notifications.
- One area with input booleans letting you configure beforehand if you want that kind of notification at all. The **notify_*** entities are thus used in the dashboard to configure what notifications you want.
It’ll look like this:

This is the most used feature in my smart home. Getting notified of and being able to acknowledge repeating warnings about open doors, finished laundry and tumble drying are meaningful features even for others than myself. But how do I set up the notification based on this?
There are two ways I handle notifications: alerts and automations. Alerts are less configurable but can be set up with less code. Automations are more flexible, but also much more verbose code wise. Let’s look at the two methods.
Repeating notifications with alerts
Alerts are especially useful when you need repeating notifications that trigger on a specific entity state. They require almost no code and have acknowledging of notifications built in. If the state that triggered the alert returns to “normal”, the alert automatically stops and you don't have to do anything.
I’ll use an “open garage door” notification as an example. Firstly, I add this to alerts.yaml to create an "alert.garage_door entity":
garage_door:
  name: Garage door open
  message: The garage door is open
  done_message: The garage door is closed
  entity_id: binary_sensor.notification_garage_door_open
  state: "on"
  repeat: 0.5
  can_acknowledge: true
  skip_first: true
  notifiers:
    - phonenotifiers
    - livingroom
The alert fires if the binary sensor “notification_garage_door_open” is on. The alert will then repeat a message every half minute via the defined notifiers. When the binary sensor turns off, or if the alert is acknowledged, it stops repeating the message. Doing something similar with automations requires a lot more code!
You probably don’t want to get notified every time your garage door is open, though. You could make the “notification_garage_door_open” a template binary sensor defined like this:
binary_sensor:
  - name: "Notification garage door open"
    unique_id: notification_garage_door_open
    state: >
      {{
        is_state('input_boolean.notify_garage_door', 'on')
        and
        is_state('binary_sensor.garage_door_is_open', 'on')
        and (
          (as_timestamp(now()) - as_timestamp(states.binary_sensor.garage_door_is_open.last_changed)) > 14400 or
          is_state('binary_sensor.it_is_night', 'on') or
          is_state('alarm_control_panel.burglar_alarm', 'armed_home')  or
          (is_state('alarm_control_panel. burglar_alarm'', 'armed_away') and (as_timestamp(now()) - as_timestamp(states.alarm_control_panel. burglar_alarm'.last_changed)) > 600)
        )
      }}
The above code will cause the “notification_garage_door_open binary sensor to be “on” if we want to be notified (the input boolean “notify_garage_door” is on) and the garage door is open. But additionally, the garage door must have been open for 4 hours straight, or it’s night, or the burglar alarm is armed and we’re at home, or the burglar alarm has been armed for 10 minutes and we’re away.
The alert turns on when the binary sensor turns on, sending notification messages to the notifiers. I use a mix of Slack, companion app and TTS (google smart speakers), defined like this in configuration.yaml:
notify:
  - name: Livingroom
    platform: tts
    tts_service: tts.google_say
    media_player: media_player.nest_audio_livingroom
  - name: Phonenotifiers
    platform: group
    services:
      - service: mobile_app_mymobilephone
      - service: my_slack_workspace_name
        data:
          target: "#my-smarthouse-channel"
When the alert is on, the notification center icon blinks orange on my dashboard, because it’s tied to the “active notifications” template binary sensor. Clicking the icon, opens the notification center, allowing me to acknowledge the alert, thus silencing the alerts that repeat every half minute.
The other way to do notifications, is by automations.
Repeating notifications with automations
Alerts are normally my preferred choice for repeating notifications. However, I have set up repeating notifications via automations in some cases, like when the laundry is done. I could have used alerts, but because I had to use automations for toggling input booleans to preserve state across reboots safely, I figured it would be less confusing keeping the logic in one place.
To get notified of finished laundry, I use a set of input booleans that are toggled based upon the washing machine power consumption, measured via a smart plug. Input booleans can’t be set through templating, but they can be manipulated through automations; that’s why I use only automations and not templating plus alerts for this use case.
I have two automations that work together to determine start and end of a washing cycle.
The “laundry started” automation sets “laundry_started” to on, and “laundry_done” to off whenever the washing machine power is above 20 watts for 5 minutes:
- alias: Laundry started
  description: ''
  trigger:
  - platform: numeric_state
    entity_id: sensor.washing_machine_power
    above: '20'
    for:
      hours: 0
      minutes: 5
      seconds: 0
      milliseconds: 0
  condition: []
  action:
  - service: input_boolean.turn_on
    target:
      entity_id: input_boolean.laundry_started
  - service: input_boolean.turn_off
    target:
      entity_id: input_boolean.laundry_done
  mode: single
The “laundry done” automation sets “laundry_done” to on, and “laundry_started” to off, if the washing machine power is below 20 watts for 5 minutes, and the washing cycle had been initiated beforehand. When the laundry is done, and the “notify_laundry” boolean is on, the automation will repeat a message every 15 seconds:
- alias: Laundry done
  description: ''
  trigger:
  - platform: numeric_state
    entity_id: sensor.washing_machine_power
    below: '20'
    for:
      hours: 0
      minutes: 5
      seconds: 0
      milliseconds: 0
  condition:
  - condition: state
    entity_id: input_boolean.laundry_started
    state: 'on'
  action:
  - service: input_boolean.turn_off
    target:
      entity_id: input_boolean.laundry_started
  - service: input_boolean.turn_on
    target:
      entity_id: input_boolean.laundry_done
  - repeat:
      while:
      - condition: state
        entity_id: input_boolean.notify_laundry
        state: 'on'
      - condition: state
        entity_id: input_boolean.laundry_done
        state: 'on'
      sequence:
      - service: script.announcement_google_speakers_daytimeonly
        data:
          entity_id: media_player.nest_mancave, media_player.nest_livingroom
          volume: 0.5
          message: Laundry is done
          message_length: 5
      - delay:
          hours: 0
          minutes: 15
          seconds: 0
          milliseconds: 0
  mode: single
The notification is sent to a custom script which evaluates if it’s daytime, before calling a second script which sets a common sound level, message length and message to all speakers:
announcement_google_speakers_daytimeonly:
  alias: Announcement speakers daytime only
  sequence:
    - condition: state
      entity_id: binary_sensor.it_is_night
      state: "off"
    - service: script.announcement_google_speakers
      data:
        entity_id: "{{ entity_id }}"
        volume: "{{ volume }}"
        message: "{{ message }}"
        message_length: "{{ message_length }}"
  mode: single

announcement_google_speakers:
  alias: Announcement speakers
  sequence:
    - service: media_player.volume_set
      data_template:
        entity_id: "{{ entity_id }}"
        volume_level: "{{ volume }}"
    - delay:
        milliseconds: 100
    - service: tts.google_say
      data:
        entity_id: "{{ entity_id }}"
        message: "{{ message }}"
    - delay:
        seconds: "{{ message_length }}"
    - service: media_player.volume_set
      data_template:
        entity_id: "{{ entity_id }}"
        volume_level: "{{ states('input_number.volume_smart_speaker_default') }}"
  mode: single
Differentiating between day and night
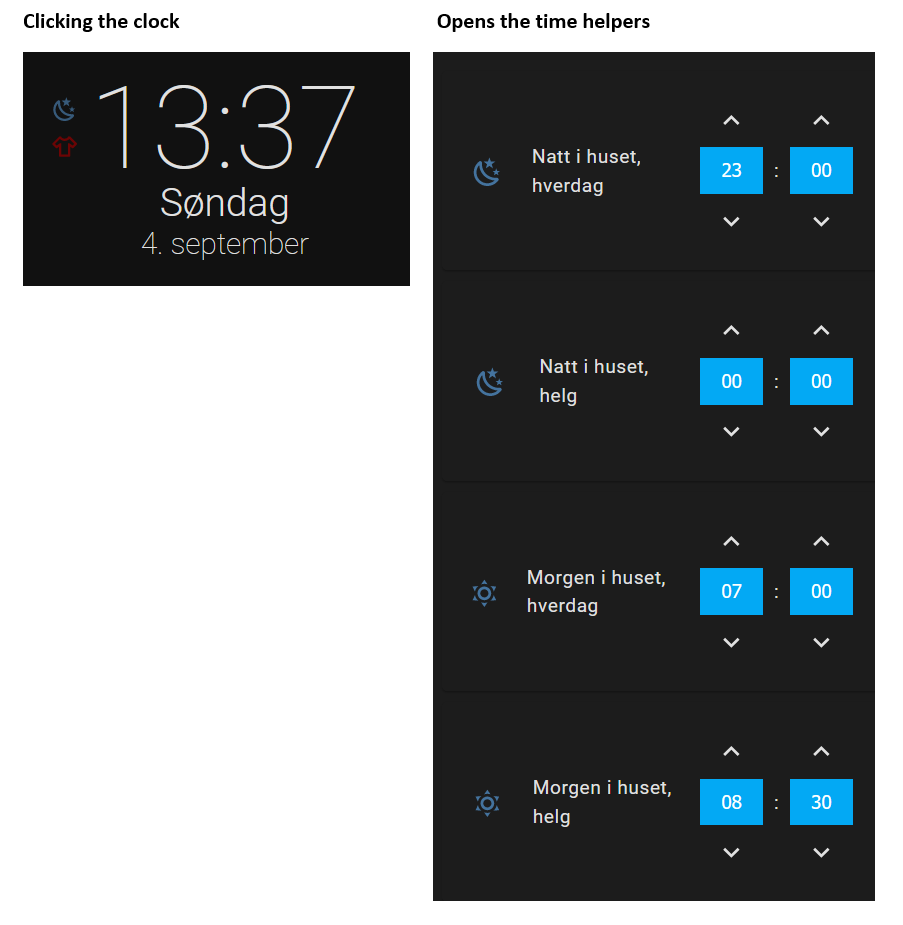
Evaluation of day/night is dynamic, based upon input time helpers that are configurable via the dashboard when clicking the clock, and the built in workday integration of Home Assistant.
You can continuously see if it’s night/day and workday/holiday from the icons near the clock. Not super useful, but more of a debugging feature. Both the clock and the icons are part of a custom button card. Check out the code in my GitHub-repo to explore it further.

A t-shirt means weekend/holiday, while a suitcase means workday. Thanks to the built-in workday integration, you can define if today or tomorrow are workdays with binary sensors like this:
binary_sensor:
  - platform: workday
    name: workday_today
    country: "NO"
  - platform: workday
    name: workday_tomorrow
    country: "NO"
    days_offset: 1
Change the country code to your country, and you Home Assistant may know about your moving holidays out of the box.
A lit up (yellow) moon and stars mean nighttime. The example above shows that nighttime starts at 23:00 (11 pm) on workdays, and midnight on weekends/holidays. Nighttime ends at 7:00 (am) on workdays, and 08:30 (am) on weekends/holidays.
It’s easy to extend the mornings if needed, and anybody can do it. It even has an immediate effect thanks to it being evaluated by a template binary sensor. Check out the “Det er natt” binary sensor in my templates file for inspiration.
The fact that the house enters “quiet mode” at night, some lights dim down at night and that some sensors are more sensitive at night, are appreciated features in my household.
The end
This is for sure a lengthy article, but I hope it has given you some valuable input for your own Home Assistant setup. Check out this YouTube video that show you very shortly how everything works.
The key takeaways are to notify only when you need to and let the household in on the smart home system by letting them interact and tweak its workings as easily as possible.
Browser-mod update
You need to modify this code to work with browser-mod 2. The good news: it's pretty easy! You mostly only have to change the popups.
This is an example of how a popup could look like with browser-mod 2:
action: fire-dom-event
browser_mod:
  service: browser_mod.popup
  data:
    size: wide
    title: Energy consumption
    content:
      type: custom:layout-card
      layout_type: custom:horizontal-layout
      layout:
        width: 400
        max_cols: 3
        card_margin: 15px
        margin: 4px 50px 0px 50px
      cards:
        - type: custom:apexcharts-card
        ...