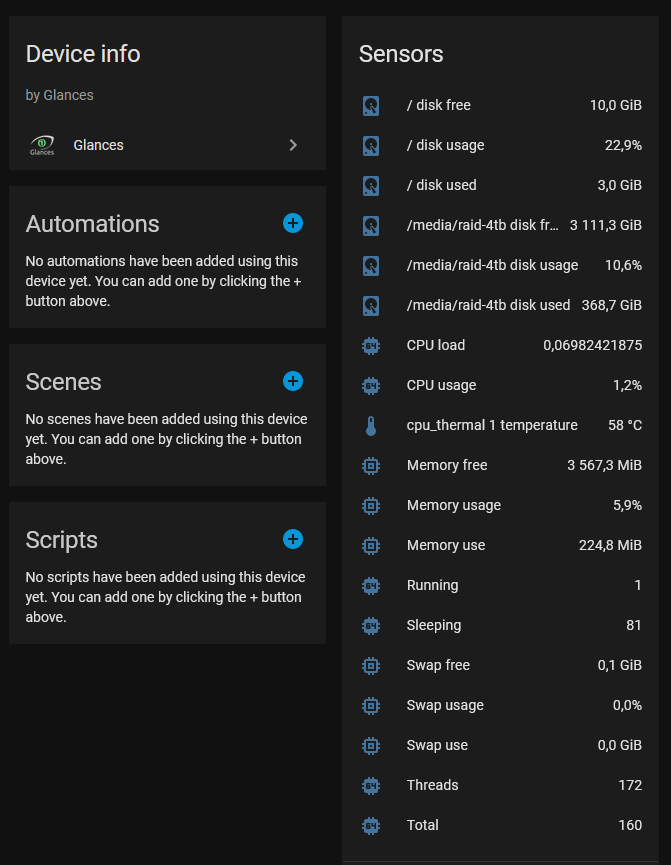
There are so many tips for monitoring your servers or raspberries through Home Assistant. Some involve Prometheus and the Grafana Add-on, some involve the RPi Reporter MQTT2HA Daemon, and others suggest Glances in various flavors.
Pick the easy (although maybe bloated) way out - and just install Glances from your package repository! But first, I'll say why I didn't go down the other routes.
Why not monitor your Raspberry with Grafana in Home Assistant?
For starters, you need to run Grafana as an add-on, and you'll have to go to that add-on to check on your server. Honestly, I prefer running my Grafana completely outside of Home Assistant. It gives me more control and a more lightweight Home Assistant server. Additionally, this route won't give you sensors to act upon or integrate in your beautiful dashboard within Home Assistant itself. So this solution is a complete no-go for me.
Why not install the RPI Reporter MQTT2HA Daemon?
Well - have you seen the instructions? I did, and turned around. I know I make some complex instructions myself - but I really like following as few steps as possible myself, if the end result is good. So this solution is a no-go for me (but it might be worth your while for all I know).
Why not install Glances via pip or download it manually?
Because Glances already exists in the package repository for your server! Not always, though, but if you run a Debian blend for example, you're in luck. So if you run Debian, Ubuntu or a Raspberry OS - good for you! But hey, if you love to set up Python3 venv's and tinker with pip and setting up the services yourself, this might be a good idea for you.
Why install Glances via apt?
Because it's so much simpler! At least when you know the caveats! And it integrates SO SIMPLY with Home Assistant with the official integration; so it's really easy to use the server sensors in your dashboard.
So how do you do it? It's simple!
Install glances:
sudo app-get install glancesUnfortunately, the Debian packaged version of Glances doesn't support the web-version, which is the version you need for the Home Assistant Integration. So, you'll have to run a magical line of code (and you may have to run it after some system upgrades):
sudo sh -c 'wget -O - https://github.com/nicolargo/glances/archive/refs/tags/v$(glances -V|cut -zd" " -f2|tr -d v).tar.gz | tar -xz -C /usr/lib/python3/dist-packages/glances/outputs/static/ --strip-components=4 --wildcards glances-*/glances/outputs/static/public/'Basically, you download the correctly versioned Glances-code from the maintainer's repo. Then unpack some static content to the the relevant directory on your server. This content is effectively web-components that are lacking in the packaged version of Glances in Debian.
Now you need to alter the way Glances is run by default.
Run:
sudo systemctl status glances
and edit the glances.services file that has been loaded. E.g.:
sudo vi /lib/systemd/system/glances.service
Replace: ExecStart=/usr/bin/glances -s -B 127.0.0.1 with ExecStart=/usr/bin/glances -w
What you're doing is switching from the server version to the web version.
After that's done:
 sudo systemctl daemon-reload
 sudo systemctl restart glances
Now Glances will start automatically after each boot and you'll have the web interface available on the default port. You can test it by visiting the following URL in your web browser:
http://<server-ip>:61208/
To know your IP, run:
ip a
Check for the "inet"-value on wlan0 or eth0 or similar.
Now, set up the Glances integration from Home Assistant. Go to:
- Settings > Integrations > Add Integration
- Search for "Glances" and select it.
- Input the Server IP-address in the "host"-field and press submit.
If your Home Assistant server and the server you want to monitor live on the same network, you will have great success.
