A while ago, I wrote an article on how to control Home Assistant with Luna LLM. This worked out okay at the time. The Luna LLM didn't always do great, but it was the one local LLM I could make work with OpenAI Funtions, as required by the Extended OpenAI Conversation integration.
The downfall of Luna + LocalAI
The other day I decided to update my software stack to get better reliability out of the local LLM, but got stuck with the dreaded panic: Unrecognized schema: map[] error in LocalAI, which runs Luna LLM for me. It seems this is a bug related to how the newest version of LocalAI translates function calls, because the Extended OpenAI Conversation integration still works perfectly when connected to GPT 3.5 Turbo API. So I started looking for alternatives for running different LLMs locally.
The alternatives
In Home Assistant, the default conversation agent is pretty dumb for the time being, and the built in conversation integrations that use AI back-ends (OpenAI and Google, are unable to actually control your smart house (Note! As of Home Assistant 2024.6.0, which was release after this article was written, you can control your smart house with these cloud alternatives). If you want to control your smart house with an external AI, you must install one of the following custom integrations:
This integration relies an OpenAI API feature that requires the LLM to reply with JSON objects that can be used for function calls. This works great if you power your smart house with The OpenAI GPT 3.5 Turbo API, or if you have a local OpenAI API implementation with a stack that supports the function calling feature.
This integration supports different back-ends, including OpenAI APIs, but it doesn't support function calling. Instead, the prompting from this integration convinces the LLM to respond in a certain way. The integration then extracts parts of the response from the LLM, in order to call Home Assistant services (at least, this is my understanding).
If you know of other viable options in Home Assistant for local control, please let me know!
Your options for local LLM
The integration in Home Assistant is only one piece in the local control puzzle. You also need an LLM back-end service. And you need an LLM that can support one of the two above mentioned Home Assistant integration options.
Apart from installing all the dependencies, libraries and stuff yourself, following intructions on HuggingFace or other places, I found three options to install pre-defined packages that resolve much of the dependency hell for you:
LocalAI (yes, you can still make it work)
With LocalAI as your back-end, you can run a multitude of models. The beauty of it, is that it comes with an OpenAI replacement API with support for functions (although broken at the time). However, I do find it tricky to configure and try out new models to run on LocalAI. And unfortunately, at the moment it doesn't even support function calling, so it won't work with the Extended OpenAPI Conversation integration. It will probably work fine with the Llama conversation integration though, because the Llama conversation integration won't use functions! You can use my guide here to use LocalAI, just swap out the Extended OpenAI Conversation for the Llama conversation integration. However, results aren't really good with Luna, so you may want to try other models.
Ollama (the easy way out)
You can run a multitude of models with Ollama. It's easy to test different models, because there is a whole library ready waiting for you. Installing new models is a breeze.
Follow these guidelines to set up server so you have access to your GPU, then easily install and configure Ollama like this from your server:
curl -fsSL https://ollama.com/install.sh | shThat's following official instructions here. You may need to install git and curl and other tooling first:
apt-get install curl gitWhen Ollama is installed, you'll notice it detects your GPU if it's set up correctly, you can pull a model from the library like this:
ollama pull mistralBy default, ollama will expose an API on port 11434, but it'll only listen on localhost. So Home Assistant won't be able to talk to it if it runs on a different server. In order to resolve this, you need to do the following:
systemctl stop ollama
systemctl status ollama
Find the service-file which defines the ollama service from the status command above, and edit it. Something like this:
vi /etc/systemd/system/ollama.serviceAdd the following at the end of the [Service] section of the ollama.service-file:
Environment="OLLAMA_HOST=0.0.0.0"This will instruct the Ollama server to expose the service to your network. Now, EVERYBODY on your network will have access to the API.
Reload the updated service definition and start the service up again:
systemctl daemon-reload
systemctl start ollama
You now have the mistral model running locally, and you can use your server IP + port 11434 to connect to the LLM from the Llama conversation integration.
Oobabooga text generation webui (for the tinkerer)
With the text generation webui from Oobabooga, you get a web UI to tinker with, where you can download and adjust the models you use. You even get a web UI where you can chat with your LLM outside of Home Assistant. Oobabooga text generation webui can be a pain to install and use, but I think by sharing my experience here, it's going to be a lot easier for you, and in the end you may even prefer Oobabooga over Ollama.
Firstly, follow my guide here up to the point where you have installed the Nvidia driver to your environment. I absolutely suggest you run a Ubuntu 22.04 environment, and that you do everything as root. That's how I got myself into the least amount of trouble.
Firstly, install git, curl and vim or your preferred text editor
apt-get install git curl vimThen install oobabooga text generation webui from the directory you prefer to install it from, for instance /root:
cd /root/
git clone https://github.com/oobabooga/text-generation-webui
cd text-generation-webui
./start_linux.sh
In my case, the installation was super smooth, I just had to choose NVIDIA + RTX and the latest Cuda package (I have a RTX 3060 GPU).
When the start_linux.sh script finishes, it has actually spun up the server and you can visit the Web UI.
I recommend going to the "Models"-tab and download a model from Hugging Face. Start with a model that is openly available without logging in to Hugging Face, like the "bineric/NorskGPT-Mistral-7b-GGUF", with filename "NorskGPT-Mistral-7b-q4_K_M.gguf". Hit the download tab in the Oobabooga text generation webui. When finished, reload the page, and look up the model in the "Model"-dropdown. Select the model, and set a couple of parameters. These are the parameters for my RTX 3060:
- Model loader: llama.cpp
- n-gpu-layers: 80 (custom, don't know if it's optimal)
- n_ctx: 7936 (context size, you don't really need this much!)
- n_batch: 512 (default)
- n_threads: 10 (custom, try out different values, 4 seemed fine too)
- alpha_value: 1
- compress_pos_emb: 1
- tensorcores: checked (IMPORTANT to offload to the GPU)
With these results, short instructions require about 3 seconds before the response is given on my GPU. I'm also running Frigate transcoding and Whisper on the same GPU at the same time.
When the model is loaded, go to the "Parameters" and take a look at the "Chat" and "Instuction template"; and then head over to "Chat" to talk to the model to test it.
The text generation webui from Oobabooga supports extensions under the "Session" tab, but some/many of these require you install requirements from the CLI before they work. This can be a little tricky if you don't know about conda.
This is how you install extensions and missing modules, considering you cloned the repo from the "/root"-directory:
source "/root/text-generation-webui/installer_files/conda/etc/profile.d/conda.sh"
conda activate "/root/text-generation-webui/installer_files/env"
Now you've activated a conda environment, which is a custom Python environment outside of the scope of your usual shell environment. From here, you can install different extensions and modules you may need, like this:
cd /root/text-generation-webui
pip install -r extensions/whisper_stt/requirements.txt
pip install git+https://github.com/openai/whisper.git
pip install -r extensions/coqui_tts/requirements.txt
If you'd like to user piper_tts, and for example use a Norwegian language model, do this:
cd /root/text-generation-webui/extensions
git clone https://github.com/tijo95/piper_tts.git
cd piper_tts/
wget https://github.com/rhasspy/piper/releases/download/2023.11.14-2/piper_linux_x86_64.tar.gz
tar -xvf piper_linux_x86_64.tar.gz
rm piper_linux_x86_64.tar.gz
cd /root/text-generation-webui/extensions/piper_tts/model
wget -O no_NO-talesyntese-medium.onnx https://huggingface.co/rhasspy/piper-voices/resolve/v1.0.0/no/no_NO/talesyntese/medium/no_NO-talesyntese-medium.onnx?download=true
wget -O no_NO-talesyntese-medium.onnx.json https://huggingface.co/rhasspy/piper-voices/resolve/v1.0.0/no/no_NO/talesyntese/medium/no_NO-talesyntese-medium.onnx.json?download=true
The Oobabooga text generation webui doesn't come with an automatic startup script, so this is how you make the oobabooga text generation webui start from boot on Debian/Ubuntu Linux:
Create a file:
touch /etc/systemd/system/textgen.serviceAdd this content to the file:
#/etc/systemd/system/textgen.service
[Unit]
After=network.target

[Service]
Type=simple
#ExecStart=/bin/bash /root/text-generation-webui/start_linux.sh --extensions whisper_stt piper_tts --listen --gradio-auth-path /root/users.txt
ExecStart=/bin/bash /root/text-generation-webui/start_linux.sh --model NorskGPT-Mistral-7b-q4_K_M.gguf --listen --gradio-auth-path /root/users.txt --api
User=root
Group=root
Environment="HF_TOKEN=*************"

[Install]
WantedBy=multi-user.target
Note! The non-commented out "ExecStart" line is the one you should use with Home Assistant if you use the NorskGPT model; it will start a server with the model loaded, and expose the correct API for the Llama conversation integration in Home Assistant. The commented out line is an example of how you start the server with extensions enabled on startup. Please note that the API doesn't work well with certain extensions enabled. The API will crash if you have enabled for example piper_tts! This is a known bug at the time of writing.
The /root/users.txt file is a colon-separated file of lines with usernames:passwords to login to the web ui. Omit the parameter and the file if you don't need authentication. The API isn't authenticated even with this parameter enabled. There is an api-key-paramater, but it's only for the openai-API, which in turn is enabled by a spearate extension.
The "HF_TOKEN" is a HuggingFace-token and needed to download for example the latest Mistral models. You also need to remember to accept the terms of usage on the Hugging Face website, for the specific model, before attempting to download it through the text generation webui interface.
After you've edited the 'textgen.service' file and taken care of the necessary requirements:
systemctl enable textgen
systemctl start textgen
systemctl status textgen
Now you can add the server as a back-end for the Llama conversation integration.
What I like about the Oobabooga text generation webui isn't its long name, but the flexibility in loading new models, ANY models basically, and trying them out quite easily.
A short note about the Llama conversation integration
The nice thing about the Llama conversation integration, is that it accepts several different back-ends. Even running a minimal HomeLLM straight on a Raspberry PI.
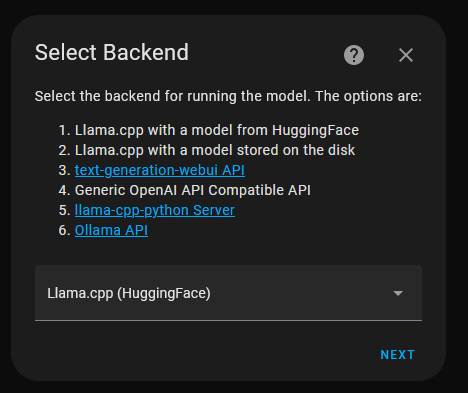
When adding an instance of the Llama conversation integration, you are presented with the following screen:

- Option 3 is for the Oobabooga-server
- Option 6 is for the Ollama server
- Option 4 is for the LocalAI server, or even for Oobabooga if you want to enable the openai API extension
On the next page, you will choose how you prompt the model. If you're English speaking, pretty much keep the defaults, maybe check if the model should use "Chat" or "Instruct". If you're English speaking, you may just use the HomeLLM-model from Hugging Face installed on your Oobabooga-server. For me as a Norwegian speaker, the HomeLLM model didn't work very well, but with a few tweaks, the NorskGPT turned out okay! But that's for another article.
