This is a guide to create your own ESPHome multisensor. The multisensor is packed with functionality in an elegant box. The components cost as little as 20$. The price includes the ESP-WROOM-32 development board and temperature, relative humidity, light, motion and sound detection, plus an RTTTL buzzer for notifications. Add CO2-measurement and IR-light measurement, and you are at 40$. Add a few more bucks and you cover the consumables too, like tape, glue, wires and 3d-filament.
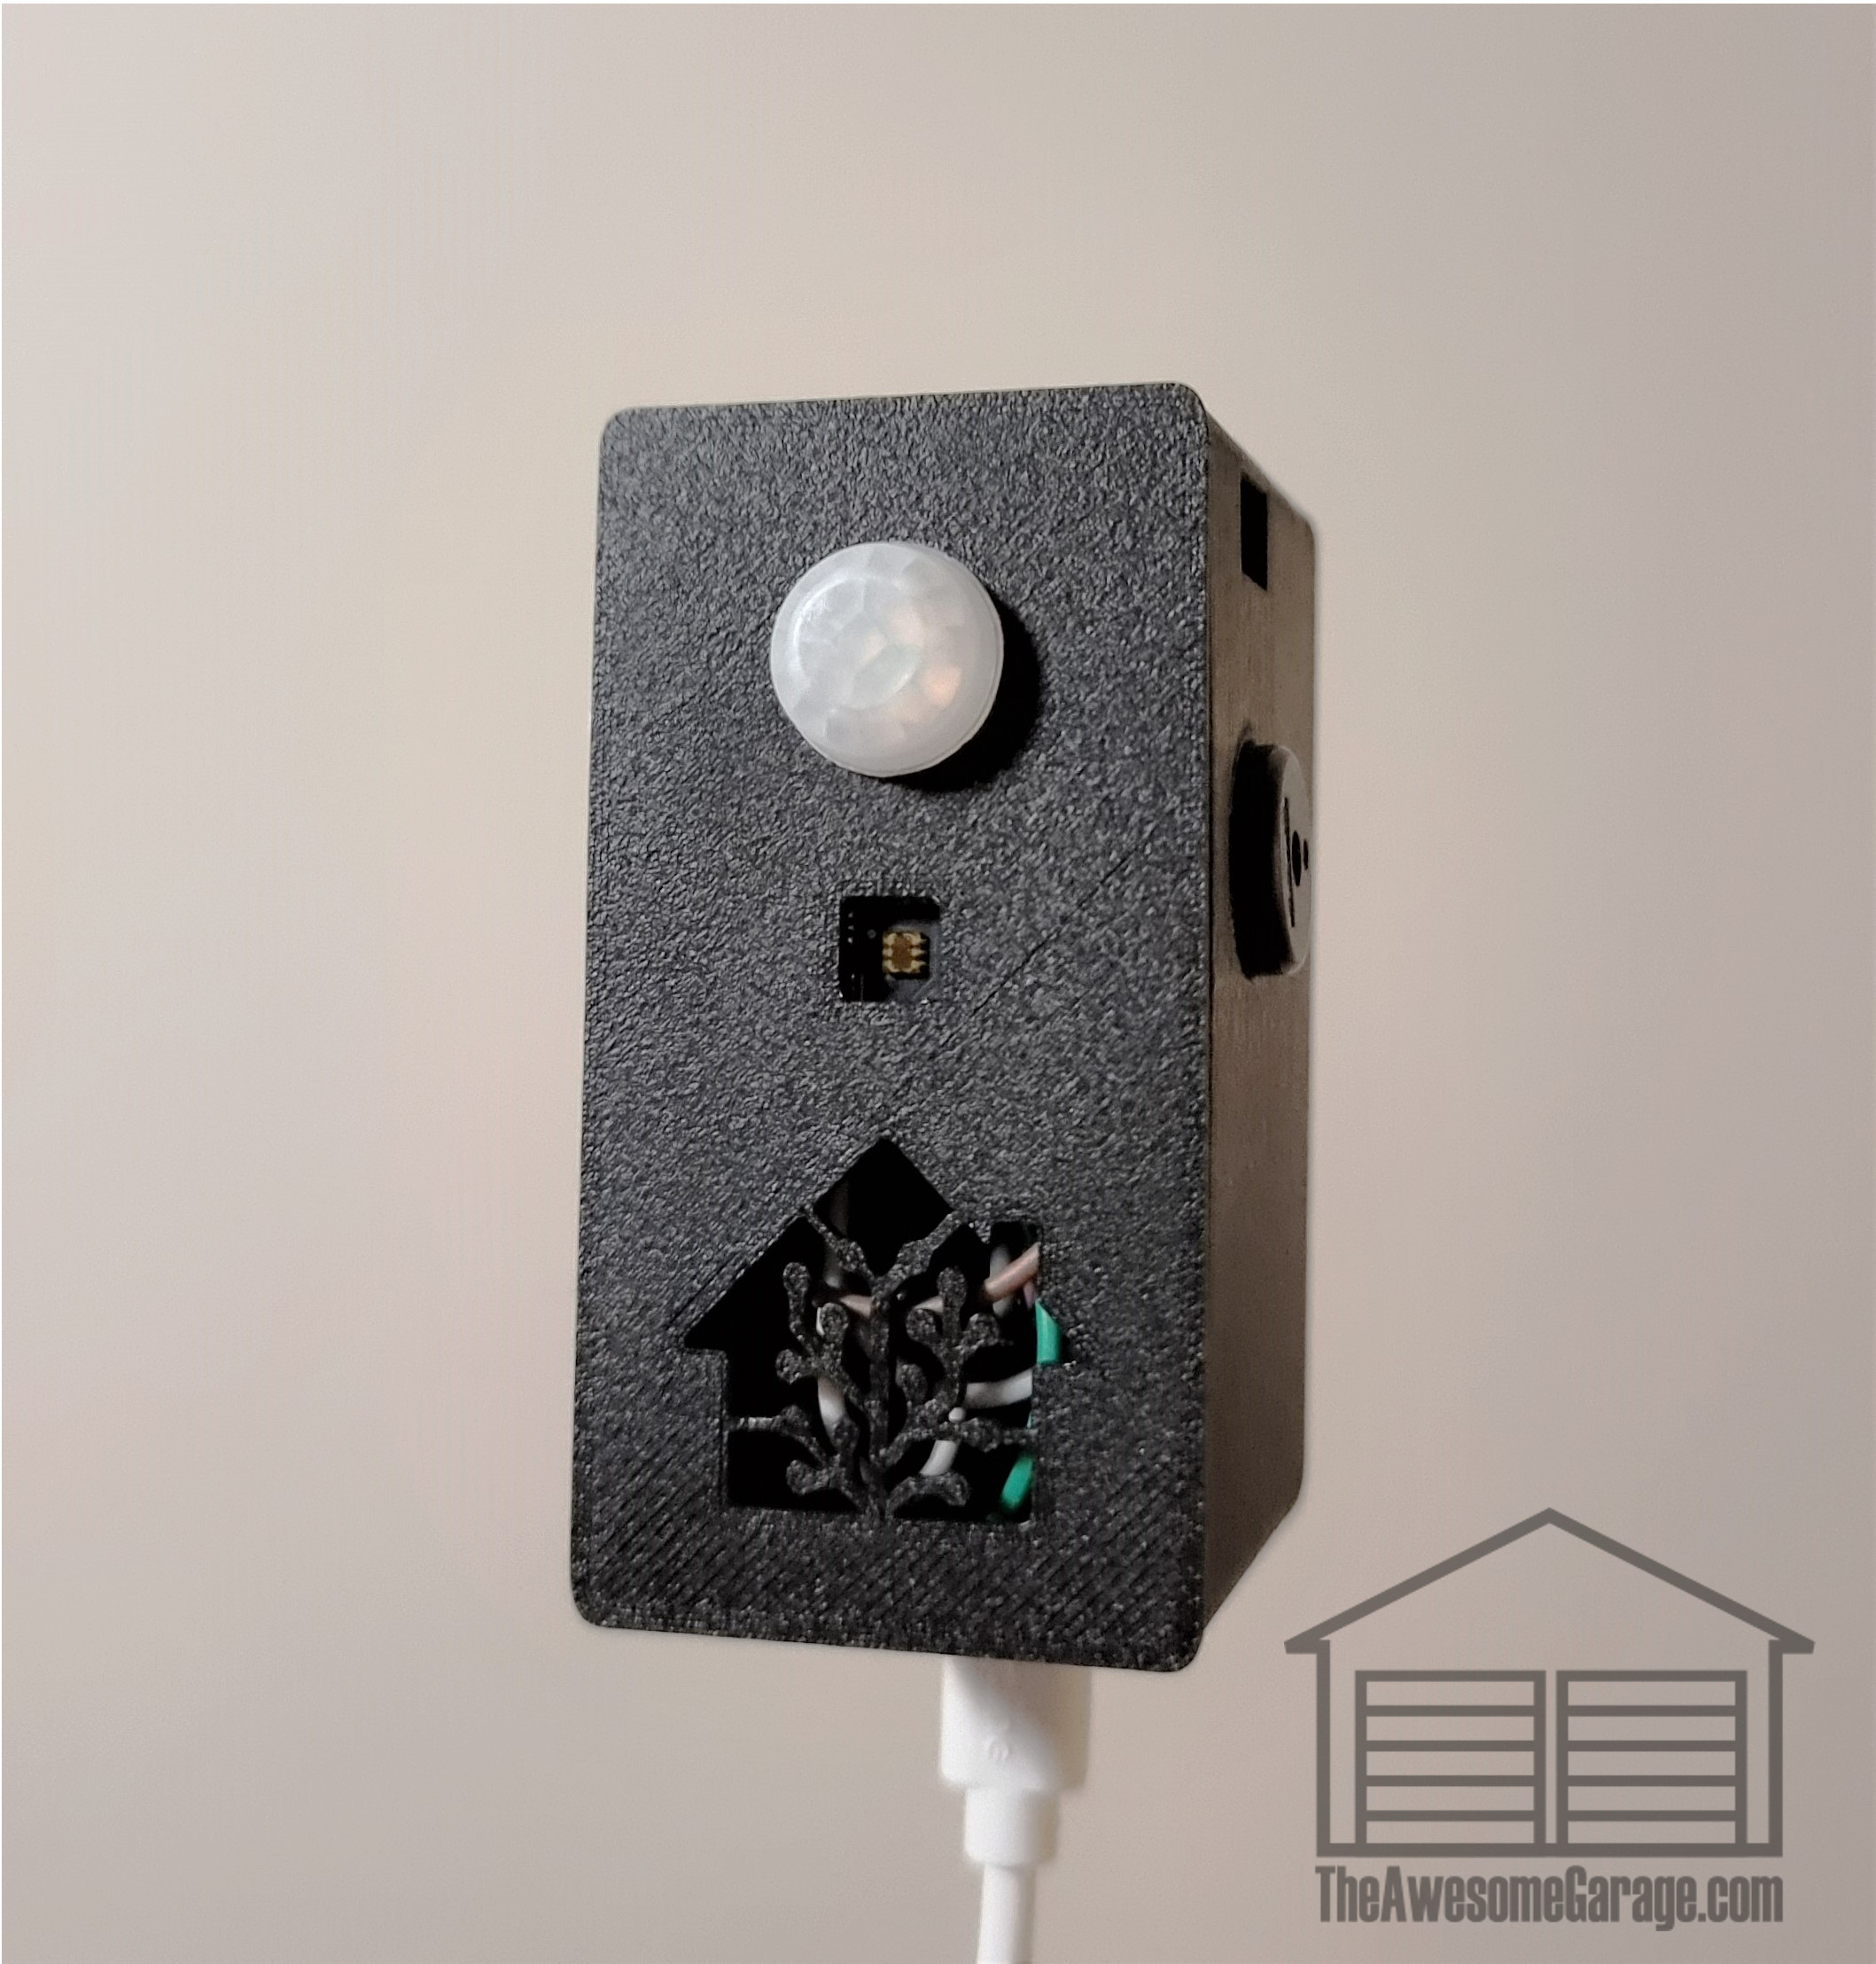
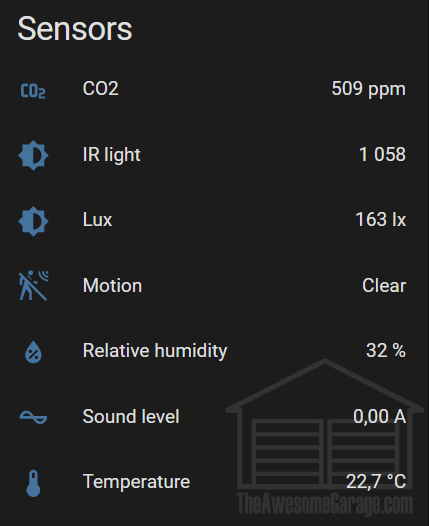
The multisensor connects to Home Assistant via Wi-Fi and is set up with ESPHome and powered by a Micro-USB cable. No soldering needed!
There are tons of use cases for this brilliant box; for example:
- Get notified if there is too much light, noise or motion in your kids’ rooms at night.
- Is there a party going on? Check for noise, CO2 and temperature levels.
- Control motorized shutters if there is too much light and heat in the room.
- Connect the temperature sensor to a generic thermostat in HA to control heat sources.
- Turn on ventilation fans if there is too much CO2 or humidity in the air.
- Create room notifications on events (dinner ready, front door opened, time to go to bed).
This guide will walk you through the steps to create your own multisensor.
What do you need?
For the enclosure
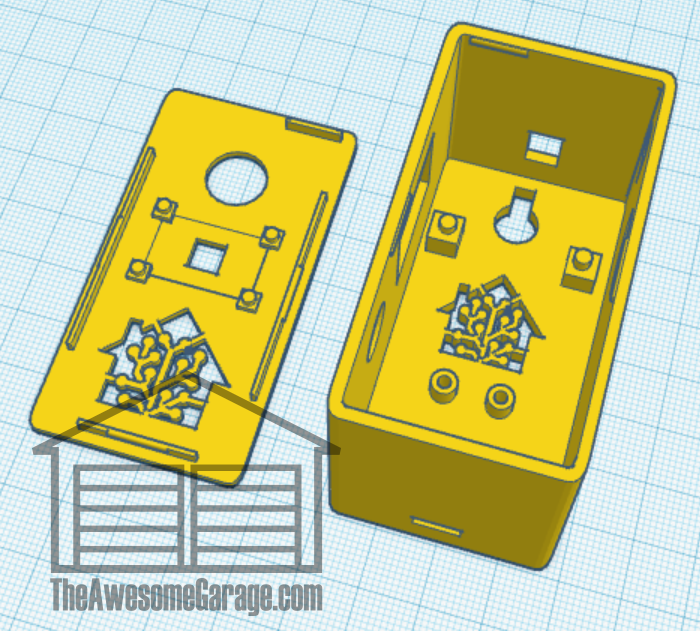
You can either use my default or alternative (simpler) custom designed multisensor 3D-printable STL design, or you can use a cardboard or a plastic box if you don’t have a printer at hand. The 3D design is free, and will only cost you around 50 cents in filament cost if you already have the filament and a printer.
| Description | |
|---|---|
| A printer | I use an Ender-3 Pro myself. It's relatively cheap and works well for my use. The Ender will cost you around 220$. |
| 3D filament | For this design a PLA-filament is sufficient. More specifically I use the E-PLA filament from add:north. A 750g roll with 1.75mm black add:north E-PLA filament costs around 30$, but you will use about 25 grams, or about a dollar worth in filament. I'm sure you can find cheaper filament of sufficient quality! |
| Sanding paper | I recommend P120 grit sanding paper to adjust the round holes that may not be completely round when printing without supports. The pins for the light sensor are also a pain, and may need some sanding. Adjusting the holes and pins is super-easy! Anything from P60 to P180 should work, but go higher than P180 and I fear the filament will start melting because it takes too long sanding it to fit. P60 on the other hand may be a bit too rough. Try whatever you have at hand first anyway! If you don't already have it, sanding paper is useful for other projects and a roll will set you back around 4$ or less. |
Generic accessories and consumables
This is stuff you probably have laying around at home. And if you don't, this is the perfect opportunity to buy it!
| Description | |
|---|---|
| Power source | You need a Micro-USB travel charger or simply a Micro-USB cable connected to an existing power source. Please use a safe power supply! |
| Wires | You will need quite a few 10-15 cm Dupont jump wire cables (FF), a pack of 40 for 2$ will do it. Go ahead and buy some if you don't already have a ton at home. |
| Insulating tape | You need insulating tape to fasten wires and protect stripped wires to avoid shorting. I guess you can get a roll for a dollar, but then you can re-use it for other projects. |
| Padded double sided tape | Really useful for fastening a couple of sensors in this design, and also a life saver at home for other stuff. |
| Hot glue gun | For fastening the motion sensor to the lid. If you don't have a pistol already, this is a great addition to the household for both kids and adults. |
| Pliers with a wire-stripper | You need to cut and strip wires, crimp connections and remove stemma terminals (more on that later). I can recommend the Proskit CP-301G precision wire stripper. It's handy and costs around 7$ |
| Wagos | Wago wire splicing connectors are life savers. You can really use one for GND and one for 3.3V. The Wago connectors are super useful to organize GND and 3.3V wires while you connect and test the sensors. Go ahead and buy a pack of 5 connectors while you're at it! It's only like 2$. |
Specific hardware
This is where the fun is at!
| Description | Cost | |
|---|---|---|
| ESP32 board | This is the brains you connect all the sensors to, and it takes care of the Wi-Fi-part. It must the 30 pin Espressif ESP32-WROOM-32 development board to fit in the enclosure from the STL design. If you plan to use your own enclosure you may choose another ESP32-variant. | 5$ |
| Light sensor | A TSL2591 Stemma QT sensor gives you values for IR-light, visible light and LUX. I used the Stemma QT version because I had it laying around. However, I removed the Stemma-terminals with pliers to lower the board height for a slimmer fit. They come off relatively easily with a pair of small pliers. The TSL2591 Stemma QT is quite expensive (but you get IR-readings!). | 7$ |
| Alternative light sensor | You may use the non-stemma version or a TEMT6000 sensor to lower your cost, but then you need to edit the STL-file. I have made an alternative STL-file that fits the TEMT6000 sensor which has a very nice price tag. | 1$ |
| Motion sensor | The AM312 is a relatively slim motion sensor that doesn’t mind sitting close to a Wi-Fi transmitter. I have terrible personal experience with the SR-501, giving a lot of false positives when enclosed with Wi-Fi, so I tried the AM312, and it works much better for my use cases. Plus, it’s smaller and fits better to this project anyway! | 3$ |
| Buzzer | The PS1440P02BT is a 14mm 3V passive Piezo buzzer made by TDK. It’s works very well with ESP32! A pack of 10 costs 6$. ESPHome with buzzers is awesome! | 60 cents |
| Sound detection | Sound detection is useful to measure ambient sound level. You won’t get an accurate dB-measurement, but an approximation. You can work with the values and thresholds to create custom notifications. The BOB-12758 (SparkFun Electret Microphone Breakout) mic with preamp is supposed to be more sensitive than the KY-037 and KY-038 alternatives. Its also smaller, and the KY-037 and KY-038 won't actually even fit the enclosure easily. | 7.50$ |
| Temperature and RH | The AM2320 and AM2302 are both well supported in ESPHome, and both supply temperature and relative humidity data. I’ve had less problems with the AM2302 and find it much more accurate, but it’s also slightly bigger and it’s normally white (which sits badly with my normally black boxes). They are equivalent pricewise. I have opted for only supporting the AM2302 because of its increased accuracy. | 2.90$ |
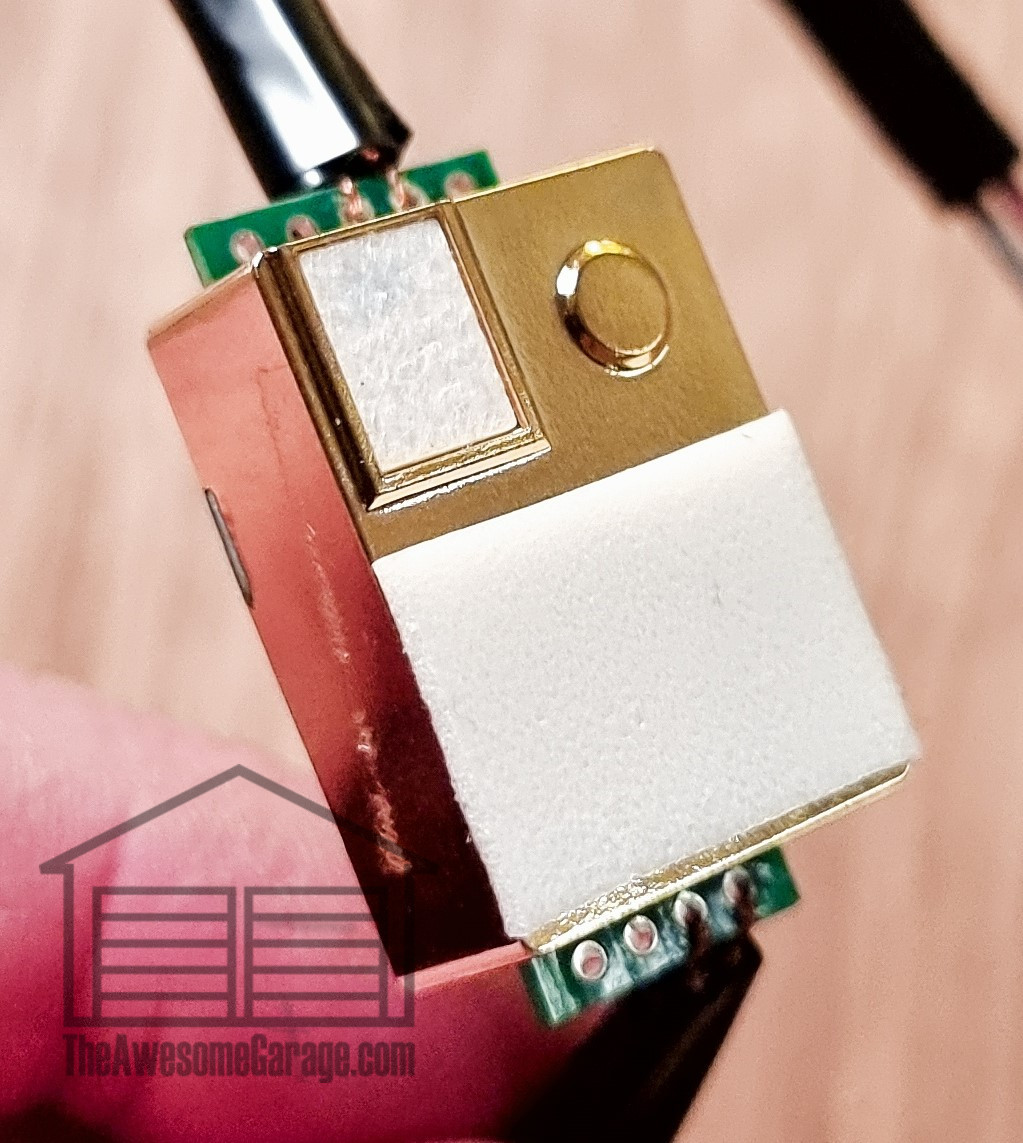
| CO2 | I use the MH-Z19B for CO2-measurements. This sensor also supports temperature measurements, but not very accurately, so you’re better off using the AM2320 or AM2302 for actual temperature measurements. The MH-Z19B works well in ESPHome but mind the letters following Z19! Other variations of the MH-Z19 may also work for you, but triple-check compatibility with ESPHome and the physical dimensions so the sensor fits the enclosure. The alternative design is without the CO2 sensor, meaning you can save a bit on a less advanced multisensor. | 14$ |
Getting started!
Flash the ESP32
Make sure you can actually flash ESPHome on your ESP32 chip. There are a few caveats here if you haven't done this before, so make sure you can get your ESP32 board into Home Assistant before you continue.
Printing
When you have all the parts, and you are sure you can reach you ESP32 from Home Assistant, start off with printing the enclosure. It takes around 3-3.5 hours on the Ender-3 Pro on default settings. Don’t bother printing with printing supports. For the add:north E-PLA I use: extruder temp 215°C, build plate temperature 60°C, retraction distance 5,5 mm and retraction speed 35 mm/s.
Connect the wires
When you have ESPHome up and running on the development board, disconnect the board from the power source and connect wires to the 3.3V and GND pins. Strip the other end of the wires, then:
- If you use Wagos, connect each stripped wire end to a separate Wago. Each Wago is now an “extension” of 3.3V and GND. Don’t mix them!
- If you don’t use Wagos, find a way to connect all sensors needing Vin and GND to the 3.3V and GND stripped wire, respectively.
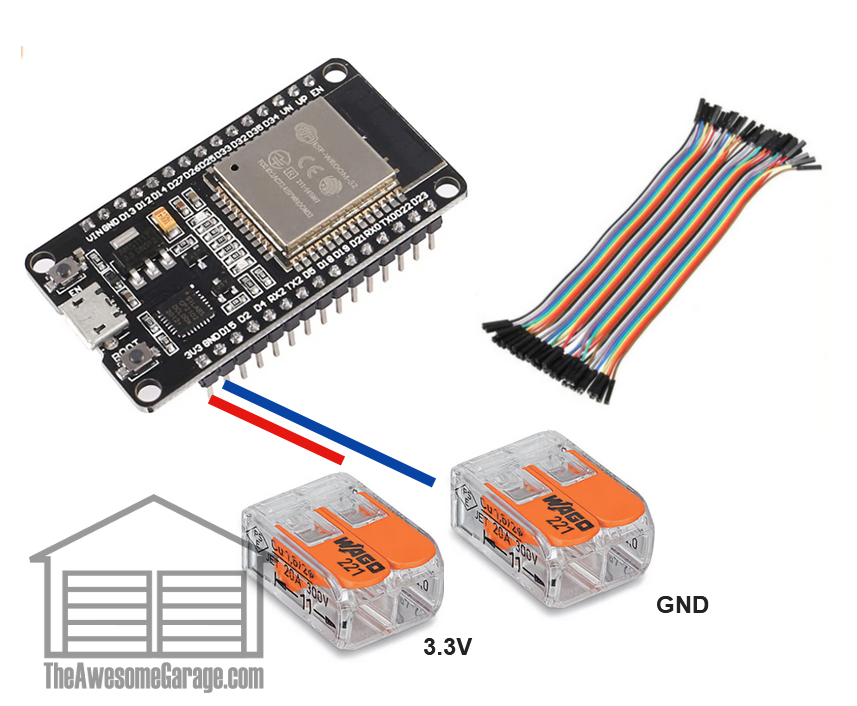
Now, we are ready to connect the sensors!
CO2 (and temperature)
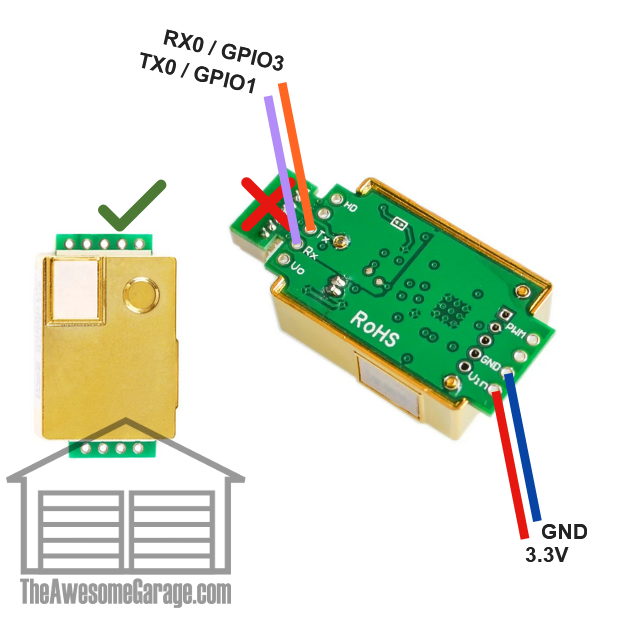
- Strip both ends of the 3.3V and GND wires.
- Twist one end of each wire and pass it through the indicated holes in the board, tie the wires and use insulation tape to keep them apart and in place.
- Connect the wires to their respective Wago.
- Only strip ONE of the ends for the Tx and Rx wires. The other end must be intact because it goes to the board.
- Connect the wires to the sensor like you did the 3.3V and GND ones.
- Connect the Rx and Tx wires to the pins on the board according to the figure. Remember that Tx from the sensor goes to Rx on the board, and vice versa!
- If your sensor has an extra part as marked with the red cross in the figure; simply use pliers and break it away before you start. You need all the space you can get.
Buzzer
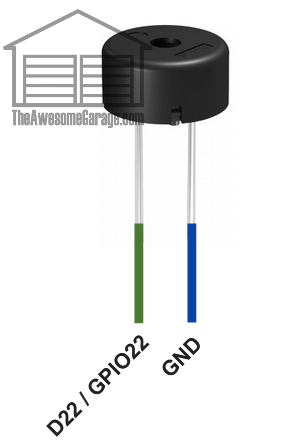
- Remove the plastic encasing on the sensor end of both wires for the buzzer.
- Cut the buzzer pins a little, so they fit snugly within the wire connection (this saves space, which you will need later on).
- Connect both wires to the sensor and use the pliers to crimp the connection. Use insulation tape on the bare metal parts.
- Pick a cable for GND (doesn't matter which for this particular case), strip the other and connect it to the Wago.
- Connect the other wire to the correct pin on your board according to the figure.
Temperature and relative humidity
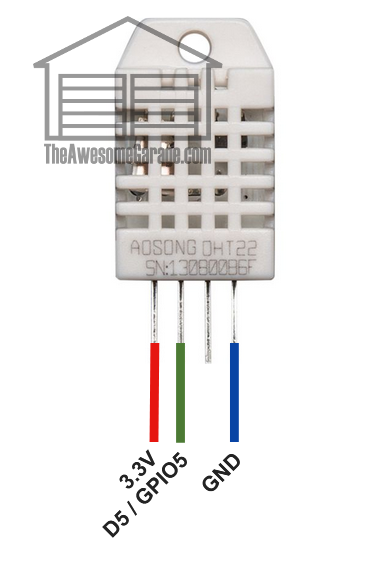
- Connect the wires following the principle of the buzzer.
- Remember to adjust the pin length.
- Except on this sensor it matters very much that you use the dedicated pins for GND, 3.3V and the signal.
Sound detection
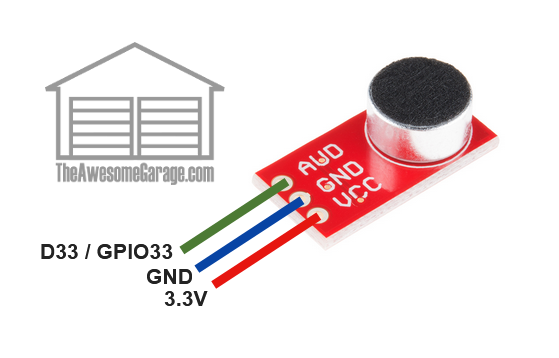
- Connect the wires following the principle of the CO2-sensor.
Motion sensor
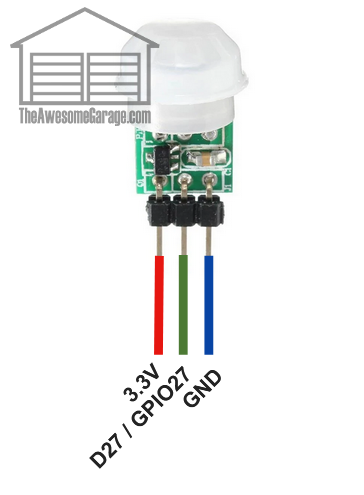
- Connect the wires following the principle of the temperature and relative humidity sensor.
- Remember to adjust the pin length.
Light sensor
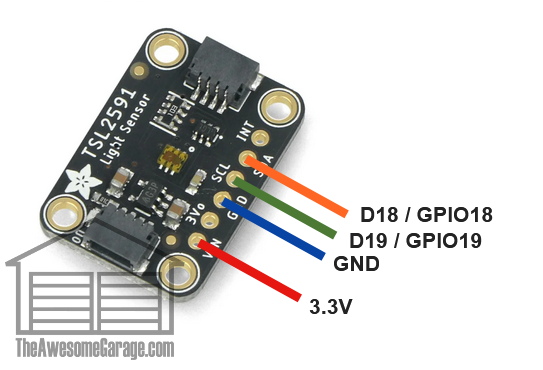
- Connect the wires following the principle of the CO2-sensor.
Light sensor (alternative design)
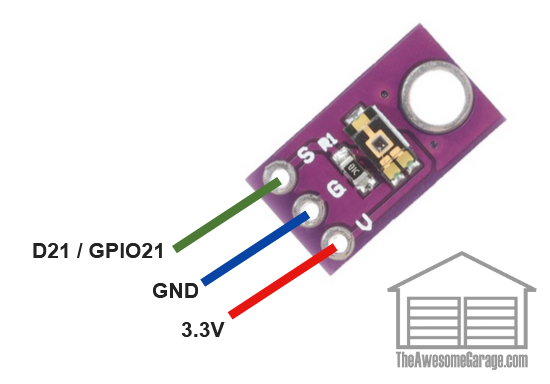
- Connect the wires following the principle of the CO2-sensor.
Configure and test your sensors
Before you continue, make sure to test that all your sensors work. For this, you must upload and adjust the ESPHome yaml-file for your device.
The YAML-file should be well anough documented, but here are the main things to remember:
- Don't overwrite all your existing ESPHome settings. If you do, you won't find your newly flashed ESP32, OTA won't work and you must start over. The multisensor.yaml is clear on what parts you should leave alone.
- Search and replace the string "<name>" with the name you'd like to give the sensor; for example the room it will be in.
- Take a look at the sensor threshold for the sound sensor and generally all the delta values. If you need more or less precise measurements, you may want to alter these values. Altering the values will impact the amount of traffic on your Wi-Fi and disk requirements for your Home Assistant instance. Higher deltas and threshold equals less traffic and less disk use. Lower deltas and threshold equals more traffic and more disk use.
- Take a look at the AM2302 temperature sensor offset value. Use the offset value to calibrate the sensor to counteract the fact that the temperature sensor is co-located with electronics that generate (a stable amount of) heat.
- If you have a Lux-meter, you may calibrate the ligt sensors by adjusting the formulas used to calculate Lux.
- You need to call a Home Assistant Service to calibrate the CO2-sensor.
Do all calibration a couple of hours after you have installed the sensor in it's final location. For the CO2 sensor, calibrate in a very well ventilated area (or outside).
Tidy your cables
When you see all the sensor readings in Home Assistant, you need to tidy your cables and get rid of the Wago connectors. They take up too much place in the enclosure! Remove all wires from one of the Wagos. Connect all the sensor wires, tie and lock them together with insulation tape. Repeat for the second Wago.
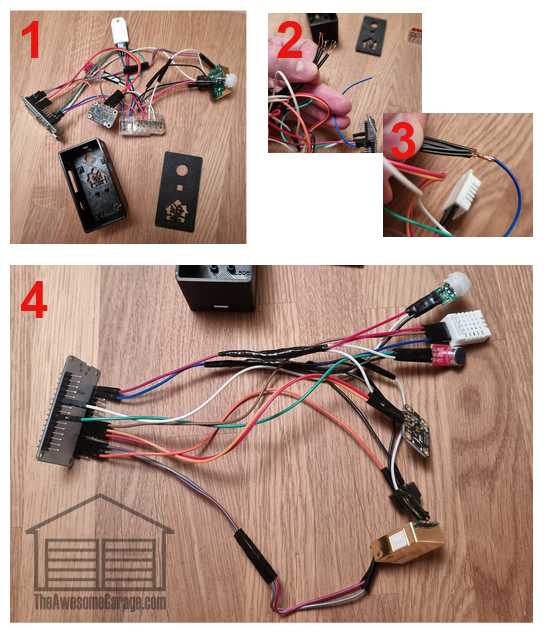
Put the sensors in place
Because you have little space, there is a particular order you should follow. First, place the temperature and humidty sensor and the sound sensor. These are tricky, as you need to remove some wires from the board pins before doing so. Make sure you document how the board layout looked like before you progress.
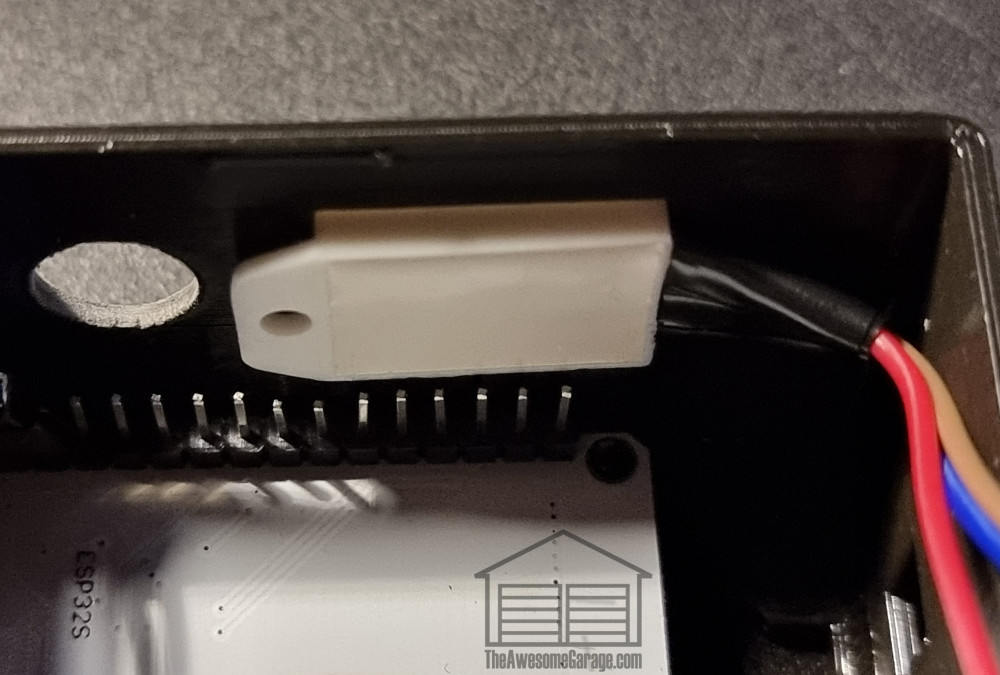
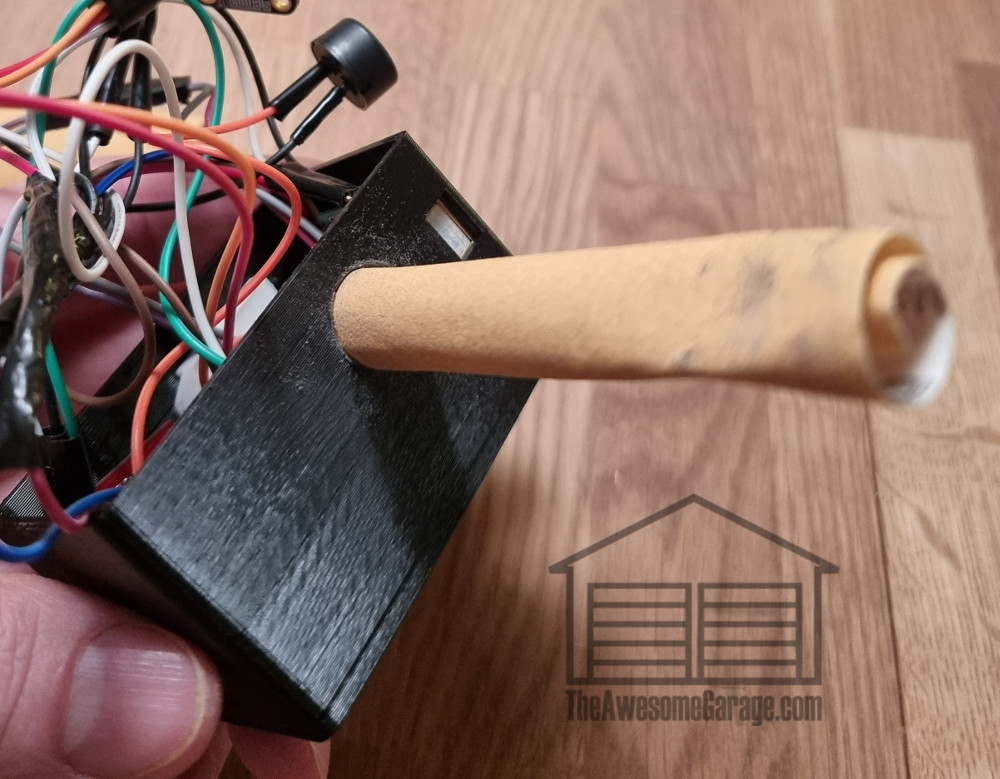
You will probably have to use sanding paper to fit the sound sensor and the buzzer. It'll be a snug fit for the buzzer, so use a little force to make it stay in place. No glue needed.
You'll need padded double sided tape (or glue) for the CO2-sensor (and maybe the sound sensor) to stick well, preferably you should also place the CO2-sensor before the buzzer.
After placing temperature/humidity, sound, CO2 and buzzer (in that order), you are left with only the light and motion sensors.
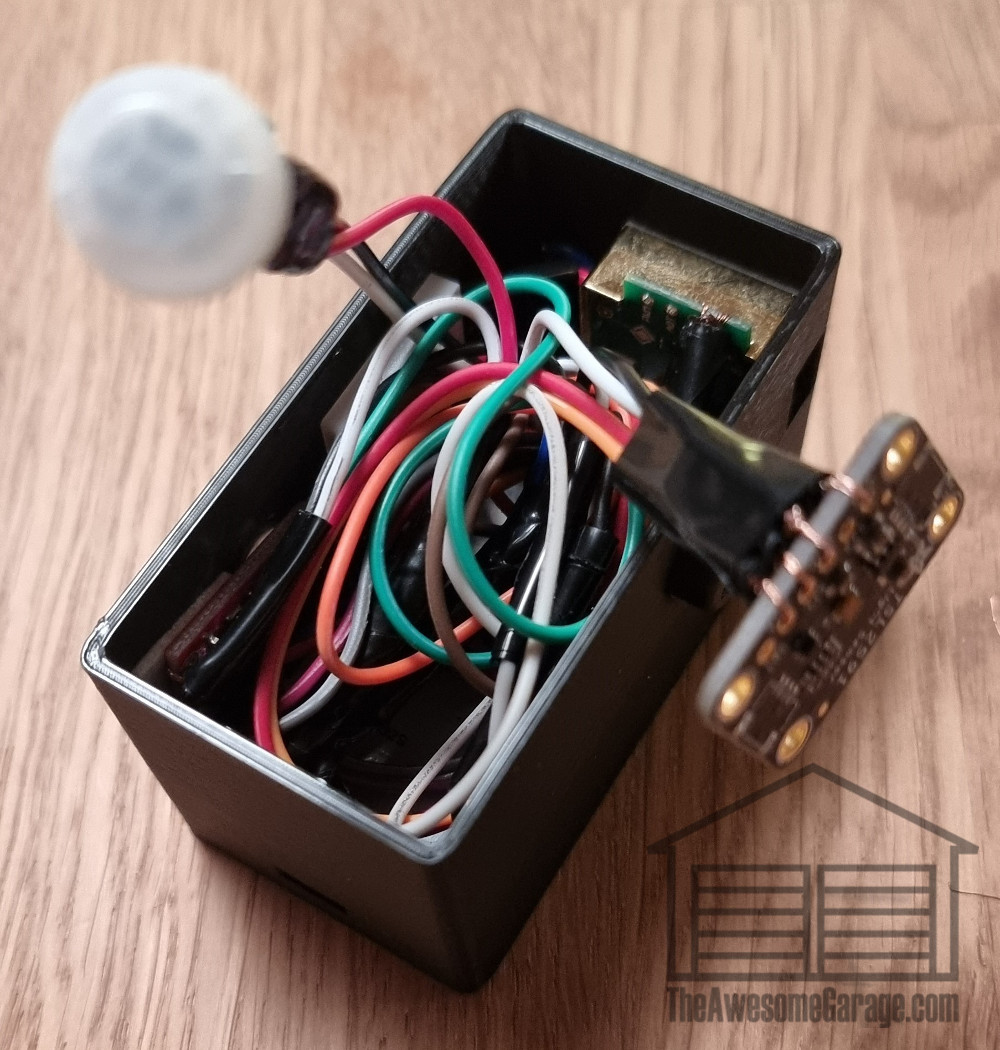
Remove the white cap AND the white plastic housing from the motion sensor and put the housing it through the enclosure lid from the outside. Fit the sensor to the housing with attention to a small groove which indicates the right way to position the housing on the sensor. Now, replace the white cap, Adjust the sensor so that it will fit inside the case when yo close it. Put a little hot glue to make the sensor stick in place. Now place the light sensor.
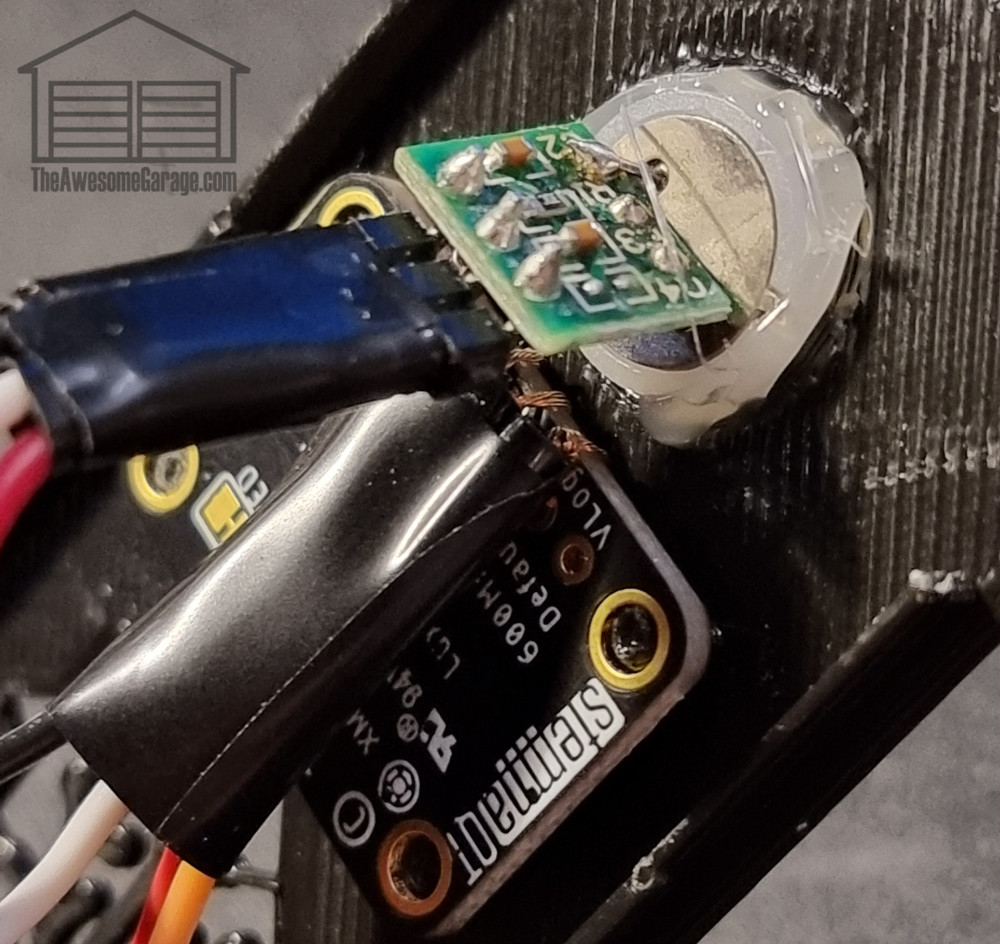
Put on the lid. You will probably have to reorganize the cables a little!
At this point, you are ready to go and hang it on the wall! I recommend putting rubber feet behind the sensor to create a small space between the wall and allow for extra ventilation.
UPDATE!
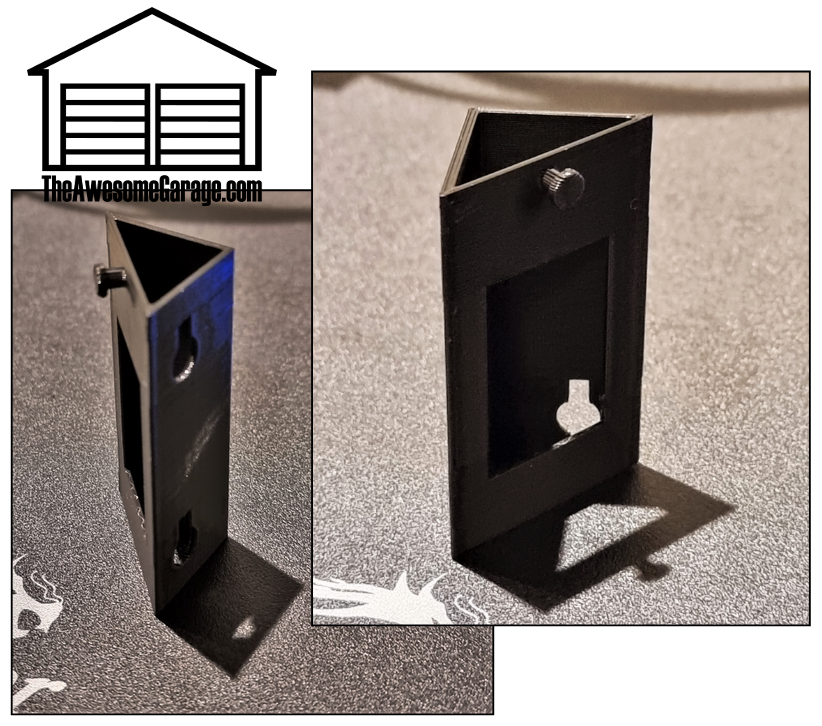
If you want to put the multisensor enclosure in a corner, or with a 45 degree angle on the wall, print my Multisensor wall support. The wall support is designed to improve ventilation compared to mouinting directly onto a wall.
If you enjoyed this project, feel free to buy me a coffee!
