The other day I wanted to start transforming my wonderful Garasjesjakk into an Android App and publish it on the Play Store. The first step would be to set up my local development environment. Easy, I thought. There are tons of tutorials on the topic, I thought. While the latter is very true, the former wasn't. Strange really, in this age of Internet Enlightenment. There are tons of tutorials, true, but most of them add some unnecessary complexity for your first attempt on an app, or they keep out key aspects that a novice really needs to know.
At my second and a half attempt on getting a simple Hello World app running on a virtual device, I started taking notes. In this blog post I simply present my notes and the minimum steps to get this working. As a bonus, you get the OpenJDK instead of the OracleJDK, which means you have no strings attached to the Oracle licensing model when you start making tons of money on your app and Oracle want to come collecting their part. Ok, I don't know if people risk Oracle lawyers paying visits if you use the OracleJDK as basis for your development, but I feel it's better to be safe than sorry, so OpenJDK it is.
The goal is getting to a running React Native, Hello World app, as quickly as possible, on a virtual device, on Windows. For simplicity, I settled for Android Studio in this walkthrough with no extra IDEs like Visual Studio Code. In parenthesis I sometimes refer to Norwegian Windows dialog names/settings.
Install openjdk8
- Go to the OpenJDK download page and choose the OpenJDK8u-jdk_x64_windows_8u222b10.zip download.
- Unzip it to C:\Program Files\Java
- Open the Windows seach dialog, search for and go to the advanced system settings ("Vis avanserte systeminnstillinger")
- Then go to environment variables ("Miljøvariabler")
- Change or add the following to system variables ("Systemvariabler"):
- JAVA_HOME=C:\Program Files\Java\openjdk-8u222-b10
- PATH+=C:\Program Files\Java\openjdk-8u222-b10\bin
Install Python2
- Go to the Python download page and choose the python-2.7.16.amd64.msi download.
- Run the installer. Make sure to add Python.exe to your path environment variable. The installer can do it for you, or add it yourself.
- PATH+=C:\Python27\
Install Node (10.16.1)
- Go to the Node download page and choose the node-v10.16.1-x64.msi download and install it.
Install Yarn
- Go to the Yarn download page, download and install the latest stable version.
Install the React Native Cli
- Open a windows shell as admin
- Run: npm install -g react-native-cli
Reboot This makes sure all your new environment variables are loaded before you install Android Studio.
Install Android Studio
- Go to the Android Studio download page and choose the android-studio-ide-183.5692245-windows.exe download. Or choose the latest Windows 64-bit download.
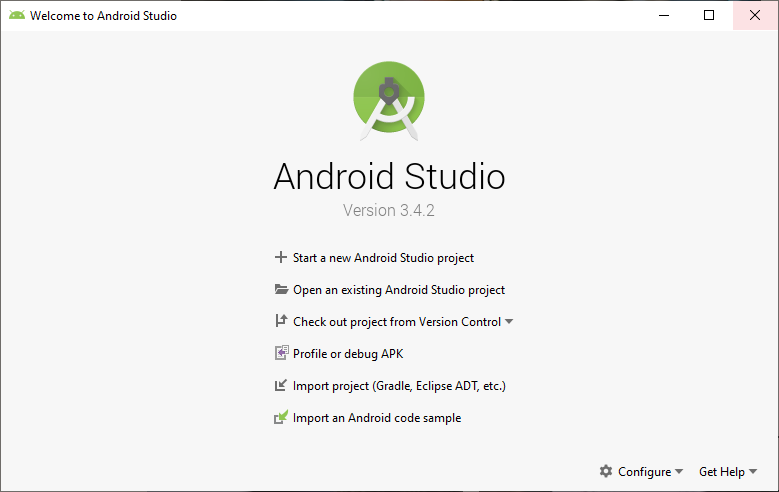
- Follow through with all the default options. If you've installet Android Studio before, you may not get to choose some necessary options, but fear not, when you get to the end of the installation you simply press "Configure". This is the start screen you arrive at when the install script has finished:
-
After clicking the aforementoned "Configure"-button on the Android Studio start screen, and select "SDK Manager", note that Android Studio configuration has a tabbed structure.
-
The default tab is "SDK Platforms"; edit content in this tab first.
- Click "Show Package details" to the bottom right and expand the "Android 9.0 (Pie)" option
- The only SDK Platform options you should have installed (to avoid mishaps as a novice) are:
- Android SDK Platform 28
- Intel x86 Atom_64 System Image or Google APIs Intel x86 Atom System Image
-
Now switch to the "SDK Tools" tab
- Click "Show Package details" to the bottom right and expand the "Android SDK Build-Tools"
- The only build Android SDK Build-Tool you need is the 28.0.3 option!
-
And now, there are some other requirements you need to check. You find these options towards the end of the "SDK Tools" list and are not contained in any categories.
- Android Emulator
- Android SDK Platform-Tools
- Android SDK Tools
- Intel x86 Emulator Accelerator (HAXM installer)
-
Click "Apply" and wait for the downloading and installation of all new options to finish. Accept all licenses.
-
Click "Ok"
-
Use Windows search to find your advanced system settings ("Vis avanserte systeminnstillinger")
-
Go to your environment variables ("Miljøvariabler")
-
Edit or add user variables ("Brukervariabler"):
- ANDROID_HOME=C:\Users\
\AppData\Local\Android\Sdk - Instead of username, add your own windows username and double check that the path is valid!
- ANDROID_HOME=C:\Users\
-
Edit or add the follwoing to system variables ("Systemvariabeler")
- PATH+=C:\Users\
\AppData\Local\Android\Sdk - Instead of username, add your own windows username and double check that the path is valid!
- PATH+=C:\Users\
Initiate your first app!
- Open cmd
- Find a suitable folder for your dev projects
- Run: react-native init Test1
- The name Test1 is completely irrelevant for this test. Pick your own name if you wish,
Test your wonderful app on a virtual device
- Open your newly created app in Android Studio (open existing Android Studio project)
- Select the folder "Test1/android"
- Note! You'll get a notice/warning that you need to update Gradle. Please do, or you'll deeply regret it a few minutes later. Trust me!
- When you have all green checkmarks in Android Studio on the lower half of your project, you're set.
- Now, Click "Tools > AVD Manager" and Create Virtual Device
- Choose, for instance, Pixel 2 and click Next
- On the next step you MUST choose Pie (Download). Download it and click Finish.
- Now you have a new device named "Pixel 2 API 28". In the "Actions" column, click the "Play" symbol and a virtual device will open. Power it on (using the Power On button on the virtual device panel).
- Go to your command shell (cmd) and your Test1 folder.
- Run: react-native run-android
- You may have to give access through the Firewall
- First time running takes some time - Yarn helps cutting down the time.
- If you get "Could not connect to development server", try going to another cmd and run: react-native start
Now, you're ready to take the next step towards cranking out apps.
Try out Viking Dominion
Embark on an epic journey and lead your Viking tribe to glory in this turn based strategy game.
Brought to you by theawesomegarage.com
About the garage
The place to build, repair and code stuff. Or for taking a break.